


In the first post, we have shortly described what is software deployment and shortly introduced methods to deploy an application using Qt tool along with listing advantages and disadvantages of these methods. In this article we will focus on deployment process on the first specific mobile platform – iOS. The deployment process will consist of several stages, the first being building an iOS application, and the last being publishing it on the App Store.
Building an iOS application with Qt and Xcode
At the beginning, the development environment should be properly prepared and configured. Development and deployment are done using Xcode. The supported workflow is to maintain a .pro file based project, which generates an Xcode project. You will need Qt 5 and Xcode to build the application. The first thing you need to do is to install Xcode, you have to make it before installing Qt5. You will find it in the Mac App Store at this link: https://apps.apple.com/us/app/xcode/id497799835?ls=1&mt=12
Next, you can download the Qt 5 installers from the downloads page and install Qt5 on the Mac computer.
You can use any version of macOS to build the application, but if you want to make it public on the App Store, you should have the latest version of Xcode. The latest Xcode is also available on the latest macOS – this way is recommended by Apple. That’s all that you need to run Qt applications on your Mac or in the simulator that comes with Xcode.Another important thing is the Xcode configuration. If you want to publish applications on the App Store or run it on a mobile device, you must remember to configure developer certificates and provisioning profiles. We will describe this process further. If you already have a development environment set up, you can move on to building the app. There are two approaches to build an application on iOS. The first one is to build it from the command line. The second is to build it with QtCreator. If you want to use the first way, remember to install Command Line Tools for Xcode proper for your version of Xcode. After installing all the necessary tools and configuring them, we can build the project. In the console, go to the directory with your application, where the .pro project file is placed and run the qmake command in the console. After completing this step, Xcode project will be created in your project folder. Then, open the Xcode project by opening a file with .xcodeproj extension. The final step is to build your application in Xcode after selecting target device. If the compilation process is successful, you will have the application installed on your device. In case of the changes to the source files, you have to repeat the process of building the application again. If you want to build an application using QtCreator, you need to follow this guide https://doc.qt.io/qtcreator/creator-developing-ios.html .
Setting up Xcode configuration
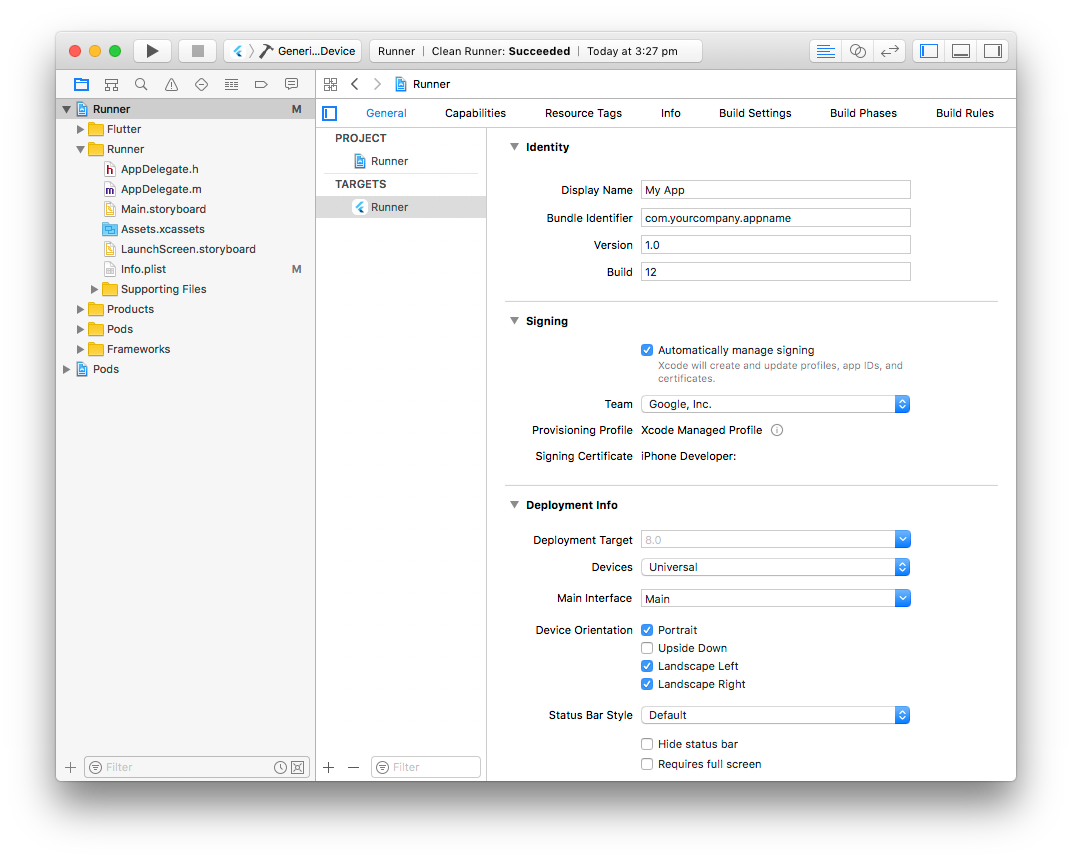
During building of the iOS app, you don’t need to create the project in Xcode. Follow the instructions in the previous paragraph, and the XCode project for your application will be created automatically. Then you need to configure the project in Xcode properly. You will need the information needed by Xcode to identify your app and you as a developer:
– Product name – name of your app as it will appear in the App Store and on a device when installed. The product name must be at least 2 characters long and have no more than 255 bytes, and should be similar to the app name that you enter later in App Store Connect
– Organization identifier – A reverse DNS string that uniquely identifies your organization. If you don’t have a company identifier, use com.example. followed by your organization name and replace it before you distribute your app.
– Organization name – The name that appears in a boilerplate text throughout your project folder. The organization name in your project isn’t the same as the organization name that appears in the App Store. If you don’t belong to any organization, enter your name.
We make all of these settings in the Xcode project as shown below.
To obtain the developer certificates and provisioning profiles you have to first enroll in the Apple Developer Program. The first step is to create an Apple ID. To do this, go to the website https://appleid.apple.com/account#!&page=create and create it. With just an Apple ID, you can access Xcode.
Preparing Your App for Distribution
In this step we make all the necessary steps needed for Xcode to publish your app to the App Store. Before you upload the already built application to App Store Connect or export or distribute it outside the App Store, you have to provide all the required information about your app – such as unique bundle ID, build string, app icon, and launch screen.
Setting Bundle ID (CFBundleIdentifier)
To distribute your app through TestFlight and the App Store, you have to create an app record in App Store Connect and enter a bundle ID that matches the one in your project. After you upload your first application to App Store Connect, you can’t change the bundle ID, so choose carefully your organization ID when you create the project or edit the bundle ID afterward. You can edit the name of the app only until you submit the app to App Review. Link to help https://help.apple.com/xcode/mac/current/#/deve21d0239c
Setting Version Number (CFBundleShortVersionString) and Build String (CFBundleVersion)
The version number and build string uniquely identify version of your app throughout the system. The version number also appears in the App Store, and for macOS apps the version number and build string appear in the About window. Both keys are required by the App Store. Set the version number and build string after you create the project by command line and Qt. Set the version number and build string under the bundle ID on the General pane of the project editor. Link to help https://help.apple.com/xcode/mac/current/#/devba7f53ad4
Setting App Category
Categories help users discover your app on the App Store. You have to set both, primary and secondary categories, under which your app is listed on the App Store, in App Store Connect. For macOS apps, you also set the app’s primary category in the project, and it must match the primary category that you set in App Store Connect. Link to help:
https://developer.apple.com/app-store/categories
Assigning Project to a Team
If you haven’t already done so, assign the project to a team. For example, if you want to distribute your app using TestFlight or through the App Store, assign all the target groups in a project to a team that belongs to the Apple Developer Program. When you upload or export your build, Xcode creates the necessary signing assets in the associated developer account. Link to help:https://help.apple.com/xcode/mac/current/#/dev23aab79b4
Editing Deployment Info Settings
You should edit deployment info settings because some settings, such as the operating systems and devices that your app supports, are used by the App Store later. Link to help:
https://help.apple.com/xcode/mac/current/#/deve69552ee5
Adding App Icon and App Store Icon
Add an icon to represent your app in various locations on a device and on the App Store. Link to help: https://help.apple.com/xcode/mac/current/#/dev10510b1f7?sub=dev8df242dec
If you want to distribute the app through the App Store, you also should add an icon specific to the App Store. Link to help:
https://help.apple.com/xcode/mac/current/#/dev4b0ebb1bb
All the above-mentioned settings are necessary to publish your application on the App Store or TestFlight.
Release your app on TestFlight
TestFlight allows developers to push their apps to internal and external testers. This optional step covers releasing your build on TestFlight. If you want to put your app in TestFlight and make it available externally, there are a few steps you need to take:
1. Navigate to the TestFlight tab of your app’s application details page on App Store Connect.
2. Select Internal Testing in the sidebar.
3. Select the build to publish to testers, then click Save.
4. Add the email addresses of any internal testers that you want. You can add additional internal users in the Users and Roles page of App Store Connect, available from the dropdown menu at the top of the page.
If you need more information, you can take a look at this page https://help.apple.com/xcode/mac/current/#/dev2539d985f
Releasing your app on App Store
When you’re ready to release your app to the world, follow these steps to submit your app for review and release to the App Store:
1. Select Pricing and Availability from the sidebar of your app’s application details page on App Store Connect and complete the required information.
2. Select the status from the sidebar. If this is the first release of this app, its status is 1.0 Prepare for Submission. Complete all required fields.
3. Click Submit for Review.
Apple notifies you when their app review process is complete. Your app is released according to the instructions you specified in the Version Release section.
If you need more information, you can take a look at this page: https://help.apple.com/xcode/mac/current/#/dev067853c94
Summary
The process of deploying application to the iOS mobile platform can be divided into two stages. The first step is building the application using Qt and Xcode on macOS operating system. As mentioned earlier, you should deploy the app using the latest version of macOS which includes the latest version of Xcode. This reduces further problems with publishing the application in the App Store.
The second stage of deployment of the application is publishing it on the App Store. This process requires lots of configuration and parameterization of the project opened with Xcode. In addition, this process is associated with the creation of identifiers and certificates that must be used in the project.
The next post will present the process of deploying the application on the Android mobile platform.

There are no comments so far